Deciding how to share code between applications and tools in your development environment is an important decision for teams to determine. Prior to module federation, code sharing likely took place by externalizing the code as an npm package. This requires you to build and deploy every application independently. Another option you might have explored is using a micro-frontend via a framework like SingleSPA. These frameworks have downsides as well, such as code duplication and poor dependency management.
Webpack 5's module federation is a paradigm shift in how teams organize and build applications. Module federation allows an application to dynamically run code from another bundle or build, on client and server. With module federation, modules in a distributed system can be shared by shipping critical shared pieces as large or small as you would like.
How does module federation differ from Micro-FE frameworks?
A micro-frontend framework has two jobs:
- load the UI code onto the page
- integrate the code in a platform-agnostic way
This means a micro-frontend framework should be able to put React UI components on a Vue page, or Svelte components in a React page.
Module federation has one job: Get JavaScript from one application into another. This means it could be used to handle the code loading for a micro-frontend framework. Module federation can load non-UI code onto the page unlike a micro-frontend framework. It allows multiple remote applications to work together to create a seemingly seamless experience.
Concepts
Let's look at some of the key concepts of Module Federation.
Host: a Webpack build that is initialized first during a page load (when the onLoad event is triggered)
Remote: another Webpack build, where part of it is being consumed by a “host”
Bidirectional-hosts: when a bundle or Webpack build can work as a host or as a remote. Either consuming other applications or being consumed by others — at runtime
Omnidirectional-hosts: hosts themselves don’t know if they are host or remote on startup. This enables webpack to change out the hosts own vendors with ones based on semver rules. Allowing multiple versions when needed.
Example architectures
The following architecture diagram shows two use cases: the NPM library and a micro-frontend.
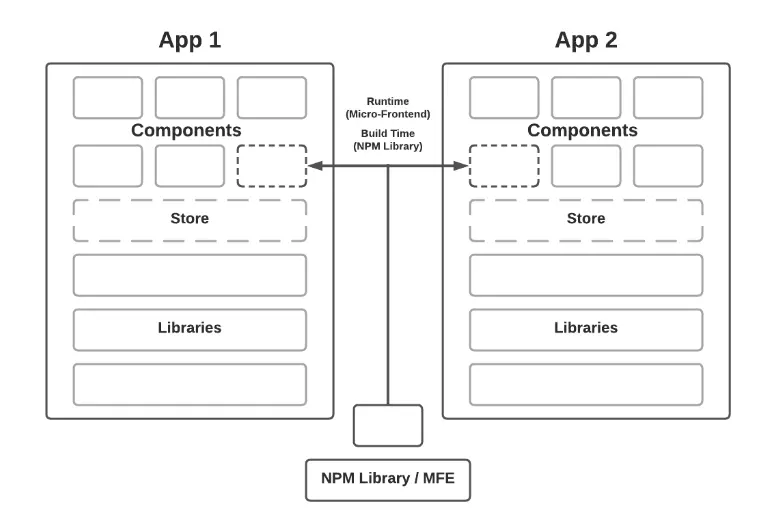
NPM Library
A shared component is shared as an NPM package that is pulled in during build time.
- Pros: If published properly, these libraries can be tree-shaken at build time, only including the required pieces.
- Cons: Every time a change is published, every application needs to rebuild and deploy to get the latest updates.
Micro-frontend
In this use case, a separate deployment external to App1 and App2 is running and is pulled in by both apps at runtime. Usually, this requires custom code or a framework such as SingleSPA to pull this external dependency in.
- Pros: These can be pulled in at runtime without the need for consumers to change.
- Cons: Dependency conflicts or duplications are common (for example, React versions and the like). Another con is that, usually, complex frameworks or custom code is required to facilitate this architecture.
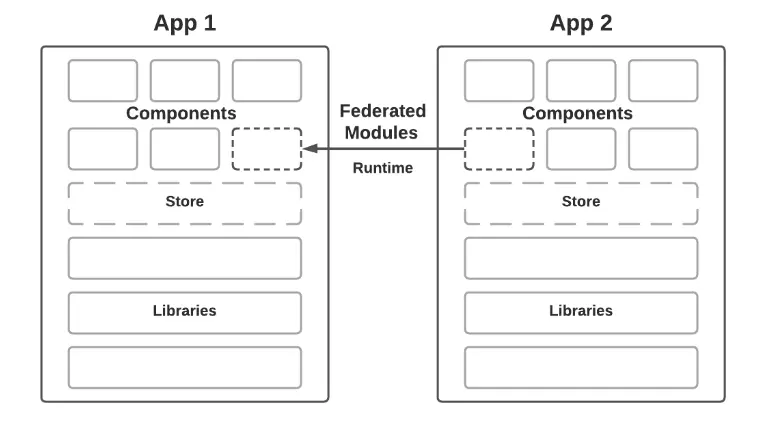
The following diagram depicts a Module Federation use case that allows applications to directly share or consume components, libraries, stores from other applications.
Benefits of using module federation
Two primary reasons to use module federation include:
Stitching together multiple pages
By creating a shell application, you could stitch together individual pages from a number of remotes to create an experience of that of a Single Page Application. And this would allow each page to be deployed, versioned, and managed independently, while allowing the shell application to manage higher level aspects such as routing and common dependencies.
Exposing Common Components as Remotes
Lets say for instance you have multiple applications utilizing a shared set of common component libraries. Instead of each application pulling these components in at build time, instead you could create a host container exposing these common components for other remotes to consume, preventing the need to re-deploy all the consuming applications when changes to the common components were made.
Where to start?
If you want to get started with module federation, I’ve included some quick first steps you can take.
Let's start with a simple example showing how a basic host and remote works with one-way communication. Want to skip all the explanation? Check out the completed GitHub example.
In this example, you will create two applications:
- App1: the host application
- App2: standalone application that exposes a simple button component
- Run the following in a terminal to make a new directory to house both of your applications and initialize each as an NPM library.
mkdir basic-host-remote-demo && \
cd basic-host-remote-demo && \
mkdir -p app1/public app1/src && \
mkdir -p app2/public app2/src && \
echo '<html><body><div id="root"></div></body></html>' | tee -a app1/public/index.html app2/public/index.html &&\
cd app1 && \
npm init -y && \
cd .. && \
cd app2 && \
npm init -y
Now that you’ve created your folder structure, set up your application by installing the necessary libraries and adding the proper scripts.
- Change directory to
app1 runand run the following before doing the same in theapp2directory:
npm i --save react react-dom && \
npm i --save-dev @babel/core @babel/preset-react babel-loader bundle-loader
html-webpack-plugin serve webpack webpack-cli webpack-dev-server
Now that your foundation is set, you can build out the remote application (App2) first. This application is going to expose its button for the host to consume, so we need to create it first.
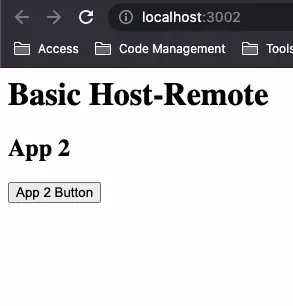
Remote (App 2)
In the app2/src directory, create a few files, as below:
app2/src/Button.js
import React from "react";

const Button = () => <button>App 2 Button</button>;

export default Button;
The following code creates the button first. As you can see, it is very simple.
app2/src/App.js
import LocalButton from "./Button";
import React from "react";

const App = () => (
  <div>
    <h1>Basic Host-Remote</h1>
    <h2>App 2</h2>
    <LocalButton />
  </div>
);

export default App;
This component is the main React app and displays the button for viewing.
app2/src/bootstrap.js
import App from "./App";
import React from "react";
import ReactDOM from "react-dom";

ReactDOM.render(<App />, document.getElementById("root"));
The above file is meant to bootstrap your application. Its purpose is to provide a safety net by exposing the main entry point as a file whose job is to asynchronously load the main application.
This bootstrapping gives Webpack the opportunity to process the rest of the imports before executing the app and will avoid potential race conditions on importing all the code.
app2/src/index.js
import("./bootstrap");
This is the main entry point as described above loading the main application.
app2/webpack.config.js
const HtmlWebpackPlugin = require("html-webpack-plugin");
const { ModuleFederationPlugin } = require("webpack").container;
const path = require("path");

module.exports = {
  entry: "./src/index",
  mode: "development",
  devServer: {
    port: 3002,
  },
  output: {
    publicPath: "auto",
  },
  module: {
    rules: [
      {
        test: /\.jsx?$/,
        loader: "babel-loader",
        exclude: /node_modules/,
        options: {
          presets: ["@babel/preset-react"],
        },
      },
    ],
  },
  plugins: [
    new ModuleFederationPlugin({
      name: "app2",
      library: { type: "var", name: "app2" },
      filename: "remoteEntry.js",
      exposes: {
        "./Button": "./src/Button",
      },
      shared: { react: { singleton: true }, "react-dom": { singleton: true } },
    }),
    new HtmlWebpackPlugin({
      template: "./public/index.html",
    }),
  ],
};
And finally the webpack.config.js the is where everything comes together. As you can see, the dev-server is configured to use port 3002, but the plugins section is what allows this all to work. The ModuleFederationPlugin is what either pulls in or exposes different parts of the application. Let's break down the different options of the plugin:
- name: pretty straight forward, the name of the app make sure these names are not conflicting so chose something unique
- library: specifies how the module is to be formatted for use in the browser context (optional)
- filename: the filename to use for the remote entry file (a manifest of all the exposed modules and shared libraries).
- exposes: the files this app will expose as remotes to other apps
- shared: these are libraries the application will share with other apps
Great, app2 is done!
To see it in action go to your app2's package.json and add the following script:
"start": "webpack-cli serve",.
And then run $ npm start
Host (App1)
Start off by creating the exact same bootstrap.js and index.js files under the app1/src folder as you have in app2/src. (See above)
We will be working slightly backwards this time so that the dev experience makes sense.
app1/webpack.config.js
const HtmlWebpackPlugin = require("html-webpack-plugin");
const { ModuleFederationPlugin } = require("webpack").container;
const path = require("path");

module.exports = {
  entry: "./src/index",
  mode: "development",
  devServer: {
    port: 3001,
  },
  output: {
    publicPath: "auto",
  },
  module: {
    rules: [
      {
        test: /bootstrap$/,
        loader: "bundle-loader",
        options: {
          lazy: true,
        },
      },
      {
        test: /\.jsx?$/,
        loader: "babel-loader",
        exclude: /node_modules/,
        options: {
          presets: ["@babel/preset-react"],
        },
      },
    ],
  },
  plugins: [
    new ModuleFederationPlugin({
      name: "app1",
      remotes: {
        app2: `app2@http://localhost:3002/remoteEntry.js`,
      },
      shared: { react: { singleton: true }, "react-dom": { singleton: true } },
    }),
    new HtmlWebpackPlugin({
      template: "./public/index.html",
    }),
  ],
};
This time, we started with the webpack.config.js because we want to pull the button into our App.js. As you can see, the ModuleFederationPlugin is where the magic is happening.
All the values are the same as above, but now there is a new option:
- remotes: An object that specifies the remotes this application consumes. Remotes is only required if you are consuming one or more remote modules.
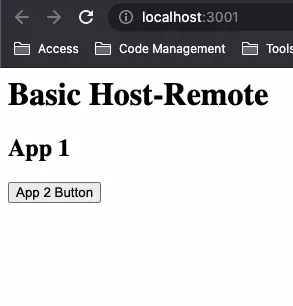
So now that you have your button from your remote, let's add it into your app.
app2/src/App.js
import React from "react";

const RemoteButton = React.lazy(() => import("app2/Button"));

const App = () => (
  <div>
    <h1>Basic Host-Remote</h1>
    <h2>App 1</h2>
    <React.Suspense fallback="Loading Button">
      <RemoteButton />
    </React.Suspense>
  </div>
);

export default App;
At the top of the file we use a React lazy import. And lower in the component we reference the Button component within a React.Suspense object. And we also specify the text Loading Button should be used until the content loads.
Congrats! The host application is complete
To everything working together go to your app1's package.json and add the following script:
start": "webpack-cli serve",.
And then run $ npm start.
Conclusion
Hopefully this tutorial has given you a glimpse at the power of module federation for enabling a JavaScript application to dynamically run code from another bundle or build, on client and server.
References
- Introduction to Module Federation (Light)
- Webpack 5 Module Federation (In-depth discussion)
- Module Federation Examples