Mutation testing is a way to test the quality of unit tests. It modifies the code to ensure that tests fail. If the tests don't fail, then it most likely indicates an issue with the test. Think of it as a test for your tests.
A popular mutation testing framework for Java applications and the jvm is PIT which can be easily integrated into a Java project by adding the Gradle plugin. Find more information about the Gradle plugin.
Setup
This article focuses on Gradle, but if you use Maven, see details on the Pitest Maven Quick Start.
Add the Gradle plugin to your Java application. Check for the latest version.
id 'info.solidsoft.pitest' version '1.15.0'
You can apply some additional configuration to build.gradle as shown below to get the tests to run more efficiently and output to a format such as XML that can be interpreted by a CI/CD pipeline. Find the full list of Configuration parameters here with more details.
Hopefully you are using JUnit5 which requires you to use an additional plugin that you can automatically import by applying the junit5PluginVersion property. See more details about which version is compatible with the version of Pitest being used here.
pitest {
    targetClasses = ['com.discover.card.myapp.*'] // List of packages to scan
    threads = 5                                     // Number of threads to use
    junit5PluginVersion = '0.16'                    // Required if using JUnit5
    excludedMethods = ['toString', 'hashCode']      // Some common methods that don't require tests usually
    outputFormats = ['XML', 'HTML']                 // HTML is included by default
}
Execution
Once you have the above added to your build.gradle, all you need to do is run the Gradle task. Please note that it's a resource-intensive process that can take 10+ minutes on an average-sized codebase that has good code coverage.
./gradlew pitest
It's possible to have pitest automatically run after the build task completes by chaining them. However, it would greatly lengthen the time it takes to perform local builds or builds on a CI server. Another option is to have pitest to run as part of a suite of tests that run during a pipeline for release candidate builds only.
Results
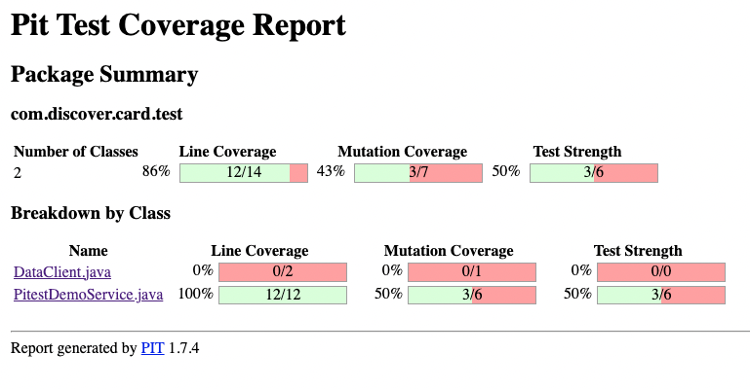
After the test completes, you should see an HTML report generated in build/reports/pitest in a subdirectory with the timestamp of execution. When you open it up, it should look something like this:

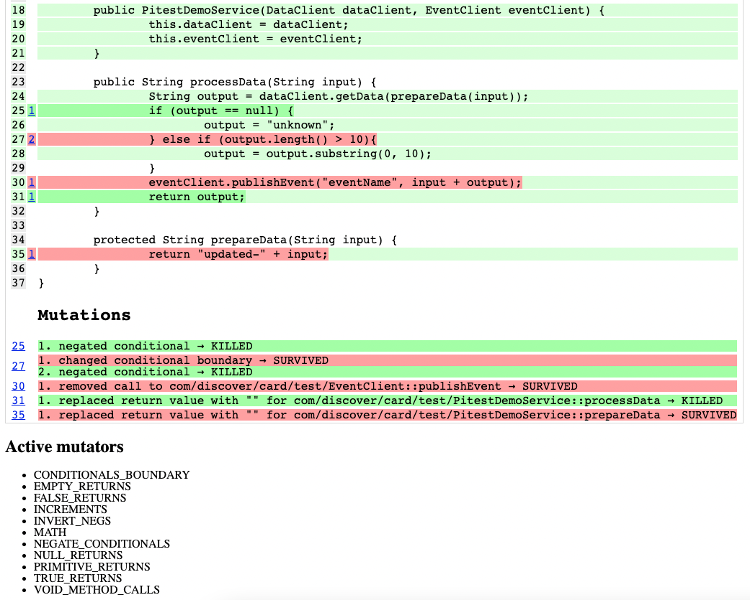
If you drill down into a test, you'll see some details about the mutations that were executed along with the status. For example:

You will notice in Green highlighted text KILLED ("Mutant was killed"), which means the test written for the specific functionality highlighted was good. Conversely, if you see in Red highlighted text SURVIVED ("Mutant survived"), it means there weren't sufficient test(s) written for the highlighted functionality. For any that survived, you should inspect the tests and enhance them to add additional assertions or create entirely new tests.
Conclusion
Mutation testing is a a beneficial tool to help engineers write quality unit tests and software. The following blog—Don't let your code dry—goes into detail on a strategy to incorporate it into the development lifecycle. Another option to address unit test deficiencies would be to have a Tech Debt User Story defined to look assess the health of your codebase and address some of the "Survived" mutants in code that contains important business logic.


