Ensuring your application can handle peak volumes in production without any issues is critically important to delivering a product that customers can rely on. Load testing can help with application sizing (vertically and horizontally), connection pool settings (for example, database or HTTP), or uncovering potential issues (for example, memory leaks).
Gatling is an open-source load testing tool that allows for automating load tests in a continuous delivery pipeline. In this tutorial, I show you how to write tests based on Scala that can be executed as a standalone process or using a Gradle plugin called Gatling.
Test setup
To set up your load test using the Gradle plugin, first check for the latest version of the Gradle plugin. Then, add the Gatling Gradle plugin in your build.gradle:
plugins {
  id 'io.gatling.gradle' version '3.8.4'
}
Writing a test
The default location that the Gatling plugin will look for source code is src/gatling/scala, so you can use this if you don't want to have to apply any additional configuration in your Gradle file.
Recording a test
If you would like to record a test using a tool like Postman or a web browser, you can download the bundle and run the recorder locally.
-
Unzip to a location of your choice, for example,
/Users/racf/gatling. -
cdinto the directory and runbin/recorder.sh(orbin/recorder.batfor Windows). -
It will launch a user interface. Note the listening port, which is 8000 by default.
-
Set up Postman or a browser to use the listening port from Gatling as a proxy along with localhost.
-
Click Start in the Gatling UI.
-
Run your tests.
-
Click Stop & Save in the Gatling UI.
-
Find the output in the 'Simulations folder' specified in the UI.
-
Make necessary updates. For example, replace the URL and a JWT token with environment variables and use a feeder CSV file for the input data.
Set up your application
If your application has any downstream service dependencies, think about using WireMock to stub those out, adding in appropriate response delay time to simulate actual production traffic. You should be able to get this information from your Application Program Monitoring (APM) tool by looking at a flow map or metric browser.
See the Wiremock Record Playback for how to record WireMock stubs. Once your mocks are deployed as a stand-alone application in your cloud, you can just configure that endpoint as your service endpoint in a mock Spring profile and apply that profile to the application being load tested.
Execute a test from local
To run a test from Gradle, run: ./gradlew gatlingRun-load.LoadTest where load.LoadTest is the fully qualified Test class. Be sure to set any required environment variables.
If you want to execute a test without Gradle, assuming you have downloaded the Gatling bundle zip file, you can run the bin/gatling.sh (or bin/gatling.bat) script to launch the test. It will look for simulations in the user-files/simulations directory, and if more than one is found, it will prompt you for one to execute.
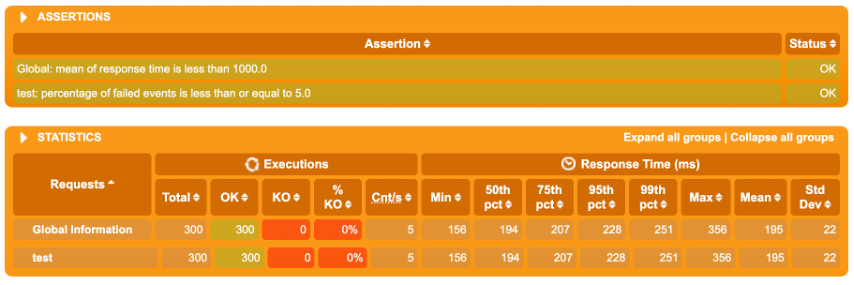
Interpret the test results
After the test is complete, it generates an HTML report with information broken down by each request as well as overall (global) information. Be sure to give your requests a descriptive name. There are also line graphs that show the metrics over time.
These reports are generated from the client side, so you will always want to compare them against server metrics in an APM tool. If there is a significant difference in load, response time, or error rate, you may need to investigate further, as perhaps the requests were not reaching the endpoint.
You will also want to use the APM tool to analyze other metrics such as JVM heap size, garbage collection, or connection pool usage.
The following image show some sample test results.

Conclusion
Hopefully, this article helped you understand a little more about load testing and the extremely helpful Gatling plugin that you can use to assess the health of your applications.